In this tutorial, I’m going to show you how to compose 8bit/chiptune music for a video game soundtrack.
If you are after that old-school chiptune synth sound, check out miniBit, our plugin synthesizer that emulates the sound of 80s game consoles and retro computers. miniBit is easier to learn compared to a full tracker, but you’ll still need a DAW/sequencer to use it. I’m using Logic Pro X, but you can use your favorite one.
Let’s start!
1. Bass
For a short bass sound let’s set up the envelope as follow:

Fast attack, short decay, no sustain, and no release (or maybe just a pinch).
Use the standard Square Wave with a bit of Sub Oscillator (which is another Square Wave tuned one octave below).
It’s always best to lower the Low Pass Cutoff a little (and add a touch of Resonance).
Don’t forget to set the sound to monophonic.
2. Chord Effect
On old consoles, the audio chips were very limited with just a few monophonic channels. So, to “fake” a chord, it was necessary to play the chord notes in a very fast sequence to give the impression of polyphony. miniBit has a built-in step sequencer that you can set as follow:
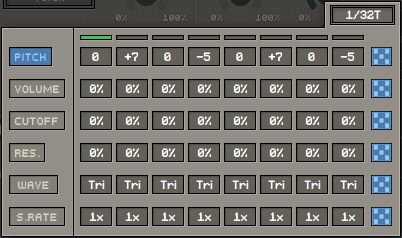
+7 is a fifth above the playing note, while -5 is also the fifth but one octave below.
The rate has to be very fast, so I’m using 1/32T.
Also, for this preset I’m using a Saw Wave (but any waveform will do) and we’ll need a longer decay and release in the envelope.
3. Key/Pad
For a pad sound we need to set a softer attack and a softer waveform like a Triangle Wave.
To add some grit, let’s downsample the sound by 2x using the Downsampler control.
Let’s switch the filter to High Pass and add some modulation to the sound. You can set the LFO like this:
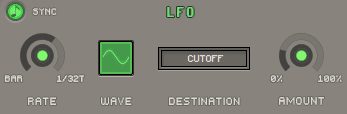
Sync should be on and the Rate set to 1/16 (but it’s good to experiment with different rates).
4. Drums
Earlier consoles didn’t have any sample playback, just basic square/pulse waves and noise generators. The only way to create some kind of drum/percussion sound was to use a pitched noise source. In miniBit you can find the classic NES noise sound that can be played at different pitches to make multiple drum sounds.
The Decay should be very short, but you can use longer values for cymbals-like sounds.
Now it’s just a matter of playing the right notes. You can use C1 for the Kick, A1 for the Snare, and A6 for the HiHat.
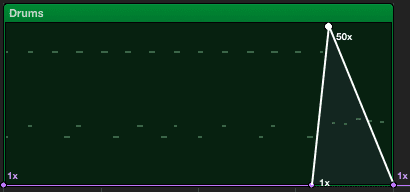
To spice up the drums, let’s add a small automation with the Downsampler, right on the fill. Like this:
5. Lead
For a good lead sound, we need a long Decay, max Sustain, and some Release in the envelope.
The preset should be monophonic and I’m using some Glide to glue the playing.
You can use one of the Pulse Waves, but anything with rich harmonic content will work.
A good lead should always have some Delay! Most old consoles didn’t have any effect on board, but Delays or even Reverbs were faked using the same trick we used for the Chord Effect: very fast step sequencing. Luckily, miniBit has a built-in Delay so we can use the sequencer later for other cool effects.
To give some life to the melody, you can use some pitch bending or even some pitch modulation with the LFO.
To make the Lead more interesting, you can use the step sequencer to rapidly change the selected Waveform, and also the Samplerate, creating some nice and rich harmonic content, like this:
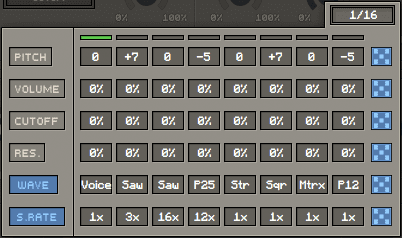
You can click on the dice icon to randomize the entire line.
To make the Lead even more interesting, you can add a synced cutoff modulation to create some rhythm in the melody.
Sign up to our newsletter for more tutorials or learn more about miniBit.