Convolution can be used to add reverberation or a specific tone to any input signal. For example, it can be used to recreate the reverb of a real space or the tone of a guitar cabinet. Convolution can also be used for creative processing.
In this tutorial I’m going to show you how to use everyday objects to make creative and unusual reverbs using our plugin Fog Convolver.
First, we need to create some impulse responses. An impulse response is a recording of the output that is caused by an acoustic source (for example a room, an instrument, or a guitar cabinet) or electronic gear when an impulse is played. The most common types of impulse used to capture a direct response are: a starter pistol shot, the bursting of a balloon, and an electric spark.
There’s also another technique that can be used to get a higher quality impulse response, the sine sweep method. This technique involves a process called deconvolution and can be a bit trickier to set up, so we’ll stick to the direct method.
If we wanted to capture the reverb of a room, we could just record a balloon pop or a starter pistol, and use that recording inside a convolution reverb. But, in this case, we want to do something different and more creative.
As you can see in the video, I started by recording two sources: a bag of cereals and a lighting match. As long as the sound is not tuned and harmonically rich (any kind of noise), it will work as a reverb.
Convolution works by multiplying the input signal with the impulse response. So, if you use tuned sources, some frequencies may be heavily amplified and the footprint of the impulse response will be too evident in the convoluted signal.
Once we have our impulse responses, we can start to fine-tune them inside Fog Convolver.
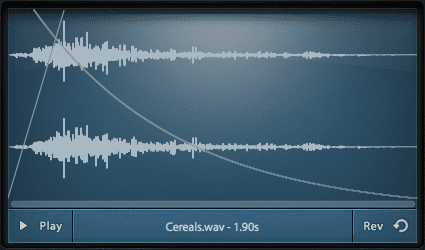
Cereals
The cereals sample works quite well, although the reverb is probably too long and the tail sounds a bit too much like a delay. That’s because the spikes in the tail are not as dense as the rest of the sample. We can use Fog Convolver parameters to shape the IR by reducing the length (using the End knob) and applying a short Fade In and a longer Fade Out, like this:
You can also change the curve of the fade: a less linear curve for the Fade Out can be more pleasant for a reverb.
To get a thicker reverb, you can lower the pitch of the impulse using the Pitch slider. This will also change the length of the IR so you might need to adjust the length again. You can also reduce the emphasis on the low frequencies by using the HighPass knob.
If you want to create a very long ambient sound, you can pitch down the sample even more (up to 8x) and remove the Dry sound so that only the Wet signal is playing.
Match
The Match sample can be used fully wet as the start is quite sharp, but you need to trim any initial “lag” using the Start knob.
Again, to reduce the boomy effect, you can dial in some HighPass, and, as with every reverb, a fade out is usually needed.
If you need a longer tail and a thicker reverb, try playing with the Pitch until you find the right balance.
Experiment!
Try to experiment with any kind of sample you can record. Use acoustic sources for organic reverbs, or experiment with noisy synths if you prefer a more unusual approach.
Sometimes IRs may sound boomy with too much low end. If a high pass filter on the IR is not enough, try to apply a simple EQ after the convolution processing.
Checklist:
- avoid tuned sounds
- prefer harmonically rich sounds (mostly noises)
- the sample shouldn’t be too short and should allow for a fade out
- adjust the low end of the sample with a high pass filter to avoid boomy reverbs
Sign up to our newsletter for more creative tips or learn more about Fog Convolver.