
This is not a step-by-step tutorial on how to create soundscapes, but rather a collection of tips and processes that I’ve learned over the years.
I really got into making ambient soundscapes a few years ago, while working as a composer and sound designer on the award-winning indie game The Swapper.
The process of creating ambient textures and soundscapes can be reduced to just three steps: source, processing, and looping.
Source
The choice of the source is very important when the processing is minimal.
All of the art in The Swapper was constructed using clay models and other everyday materials. I tried to match that approach with both music and sound design.
I focused on getting an organic and analog feel to match the game style and, when possible, processing everything to give a “sci-fi” feel. So, finding the right source was paramount.
For example, the cracking sounds of the spaceship were made by recording my old freezer from the inside (to the joy of my microphones). Strange and mysterious sounds can be heard if you keep the freezer door open for a few minutes and then close it with a portable microphone buried with a healthy variety of frozen food.
Any kind of field recording can also be used as a good organic source. Even recordings with harsh conditions like rain and wind, with the right processing, can be turned into perfect soundscapes.
The choice of the microphone can be as important as the source, as you can experiment on each source from a different perspective. For example, you can record something like a water boiler tank with both a standard condenser microphone and a piezo (contact-mic) directly attached to it. The results are completely different and can be mixed together or processed in different ways.
If you want to use water as a source and don’t have a hydrophone, just put a ballon or condom onto a cheap microphone and experiment.
Even electronic sources can have an organic feel. Just use an inductor microphone on any kind of electronic object: power supplies, lights, hard disks, TVs, smartphones, etc…
I’ll talk more about microphones in a future post.
Processing
When the processing is really heavy, it doesn’t really matter which source is used as it will be completely altered. Digital sources are preferred when using complex processing, as those are usually easier to control and adjust.
The most important processing needed to make soundscapes is slowing down the audio source.
There are two main ways of slowing down, one that alters the pitch, one that doesn’t.
Altering the pitch can create more low-end content, so some EQ or filtering might be needed to compensate and avoid any boomy effect.
Slowing down without altering the pitch can instead create a more grainy texture. Using a reverb, in this case, can help smooth out the sound.
One important thing to consider to improve the quality of the slowing down process is the sample rate of the source file. The higher, the better. If your session is at 44.1kHz, it’s a good idea to record sources at least at 88.2kHz. This way, slowing down by 2x will use up all the samples without introducing artifacts.
Reverbs and convolution, in general, are very effective to give space and smooth any kind of source. You can really abuse reverbs in these cases and even use the wet signal only. Read more about creative convolution reverbs.
If you want a simple yet powerful granular reverb plugin, you can check Things – Texture. Texture can easily transform any sound into an ambient soundscape, or add that drone vibe to your tracks with minimal setup.
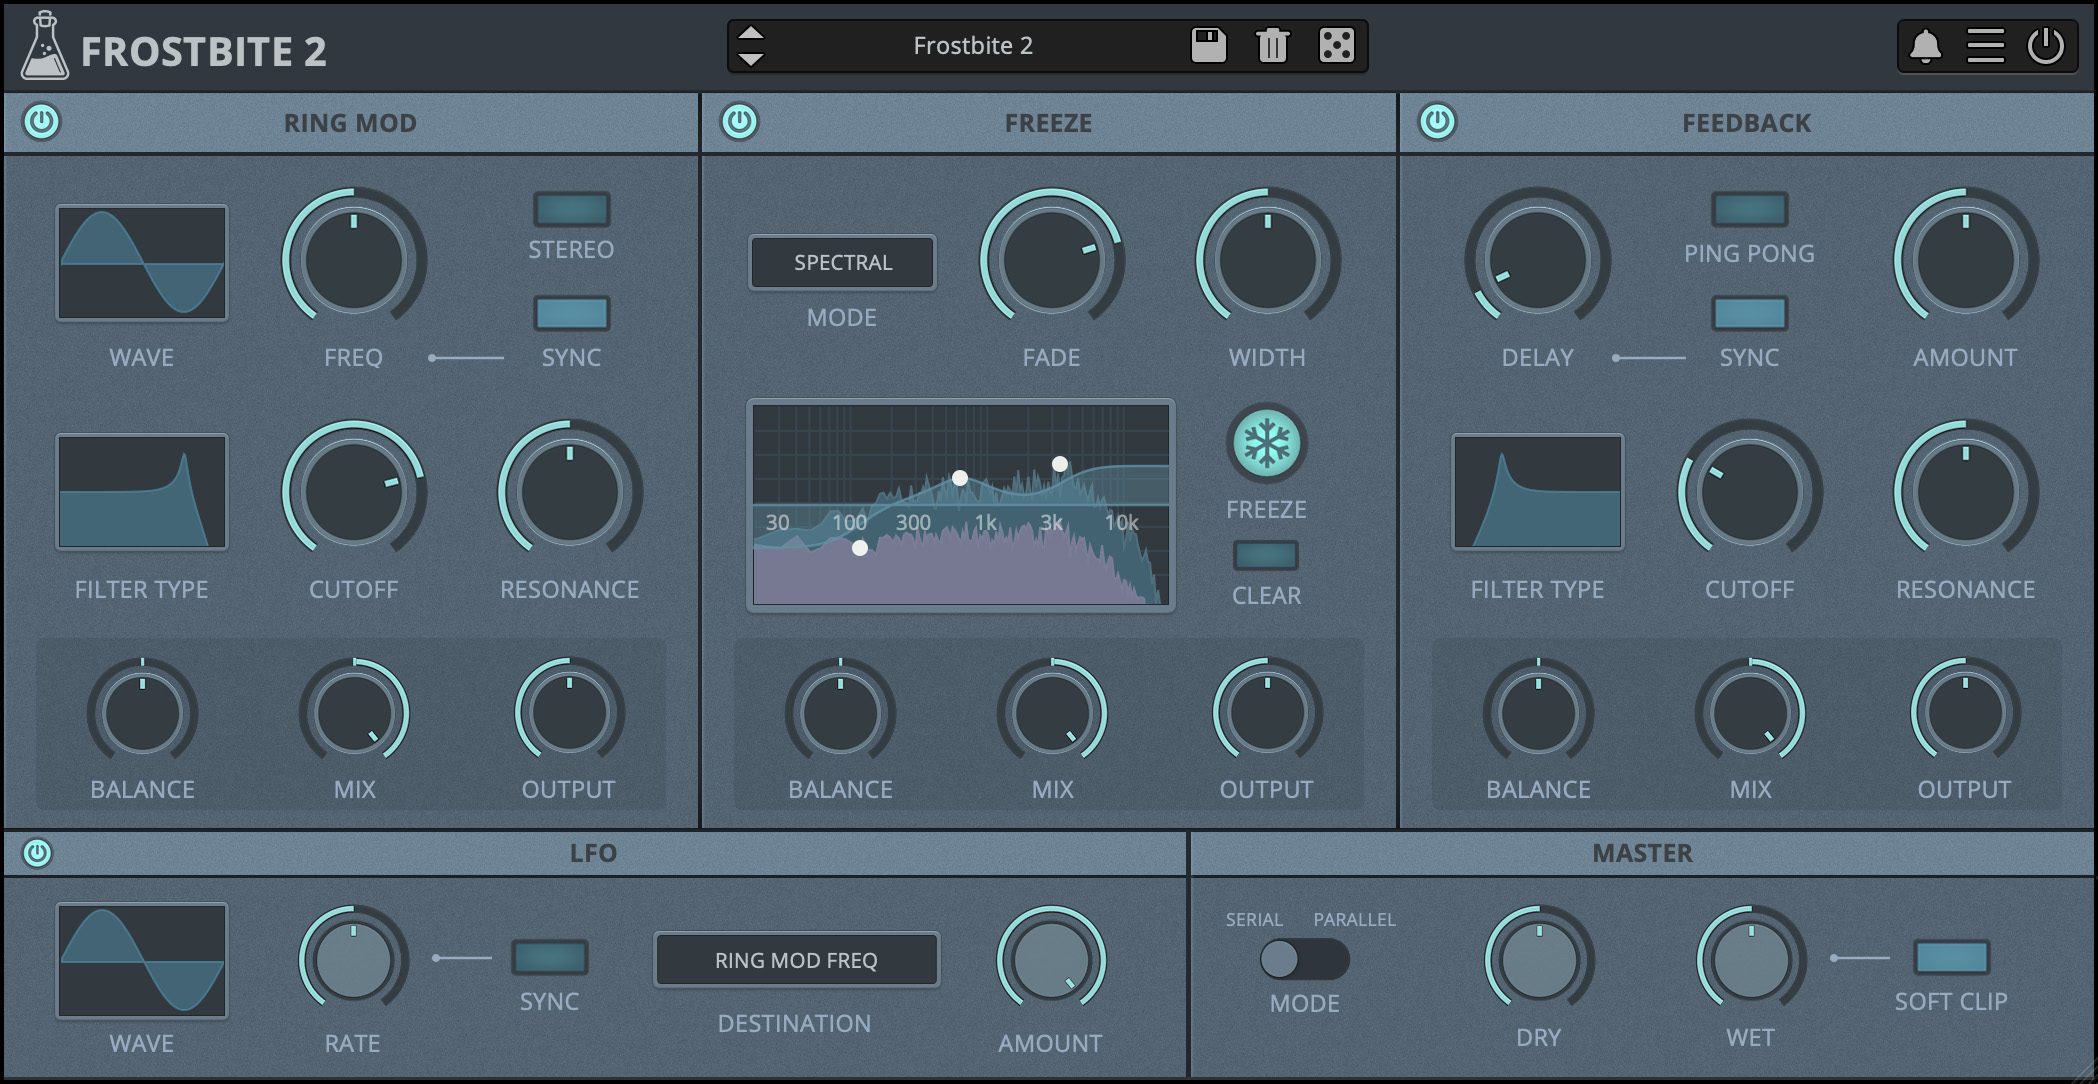
Besides the use of reverbs and convolution, granular or freezing effects can be used to really transform any source in a long soundscape. Our plugin, Frostbite, features a ring modulator, feedback, and freeze module. These modules can be combined to turn any source into a mangled texture or ambient soundscape. Frostbite was heavily influenced by the processing I used for The Swapper, and it can be used as a good starting point for processing sources into soundscapes. You can use it on any kind of source, even synths, and tune the results in real-time.
There’s also a very good tool to do extreme sound stretching: http://hypermammut.sourceforge.net/paulstretch/
Delays can also be used to create soundscapes. Our plugin, Outer Space features both a tape echo and a spring reverb section. By pushing the intensity (feedback/repetitions on other delays) you can create an infinite loop that can be further mangled with other effects.
One last thing to try is to mix back the unprocessed source, even slightly, with the processed sample.
Looping
While making very long soundscapes can be easy, sometimes it’s just better to loop a portion of the sample to have a more consistent ambient background.
We can sacrifice the beginning and the end of the sample to create a seamless loop.
This process doesn’t always work, especially if the harmonic content changes too much between the start and the end of the sample, so it’s worth experimenting with different parts of the sample if necessary.
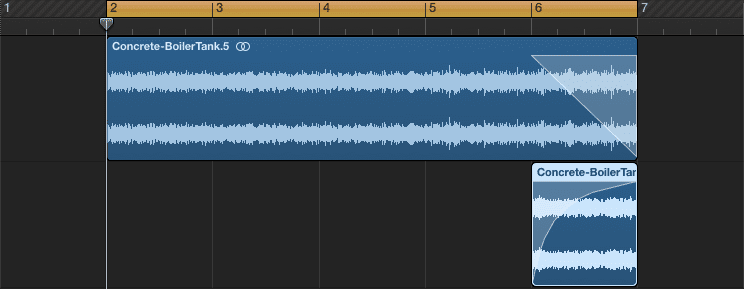
Cut at least a few seconds from the beginning, overlap it to the end of the sample, and apply a crossfade.
The longer the sample, the better, as we can cut more and create a better crossfade.
A good tip is to manually make the crossfade, applying a linear fade down and a more curved/exponential fade in seems to work better than a normal crossfade.
Sign up to our newsletter for more creative tips or learn more about Frostbite or Things – Texture.